Appearance
Offers
Now let's look at Offers and what this section on the Metro Dashboard entails.

Public Offers
This section displays the offers that are currently available for customers to buy into.
NOTE
Before proceeding to create an offer, Brokers, Banks and Currencies MUST be created or you will be unable to proceed. This will be demonstrated below.
Step 1: Click on the gear icon at the top right to open the Settings Menu.

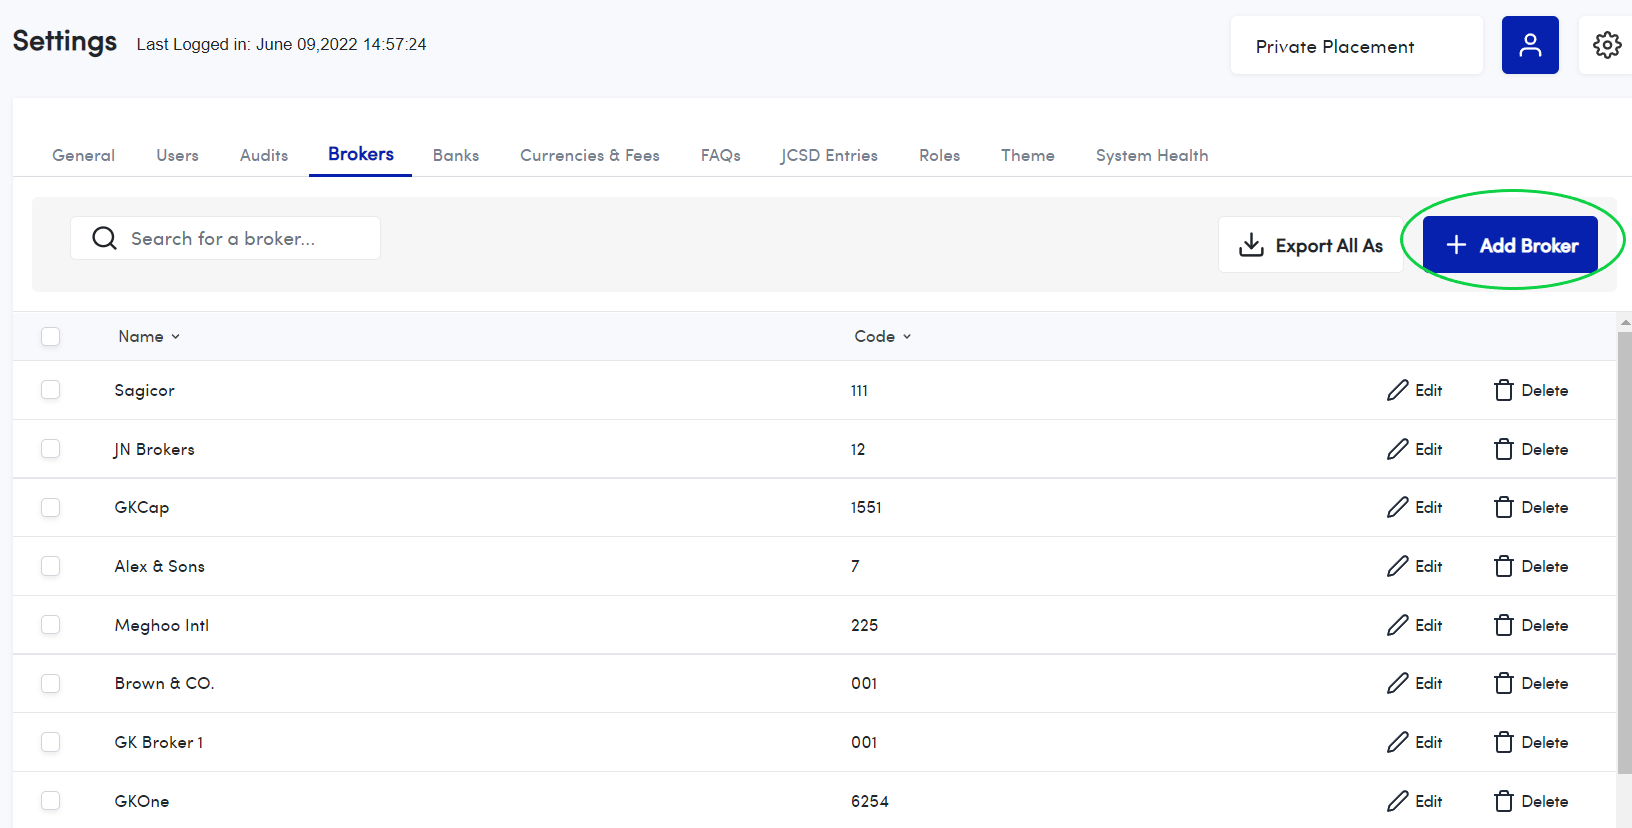
Step 2: From the drop-down menu, select "Brokers".

Next, click the blue rectangular button in the top right-hand corner labeled "Add Broker"- It's in the image shown below:
Step 3: A new window will appear. It is in the image below. Fill out the fields in this window with the Broker's name and Code. Finish by clicking the blue "Add Broker" button.

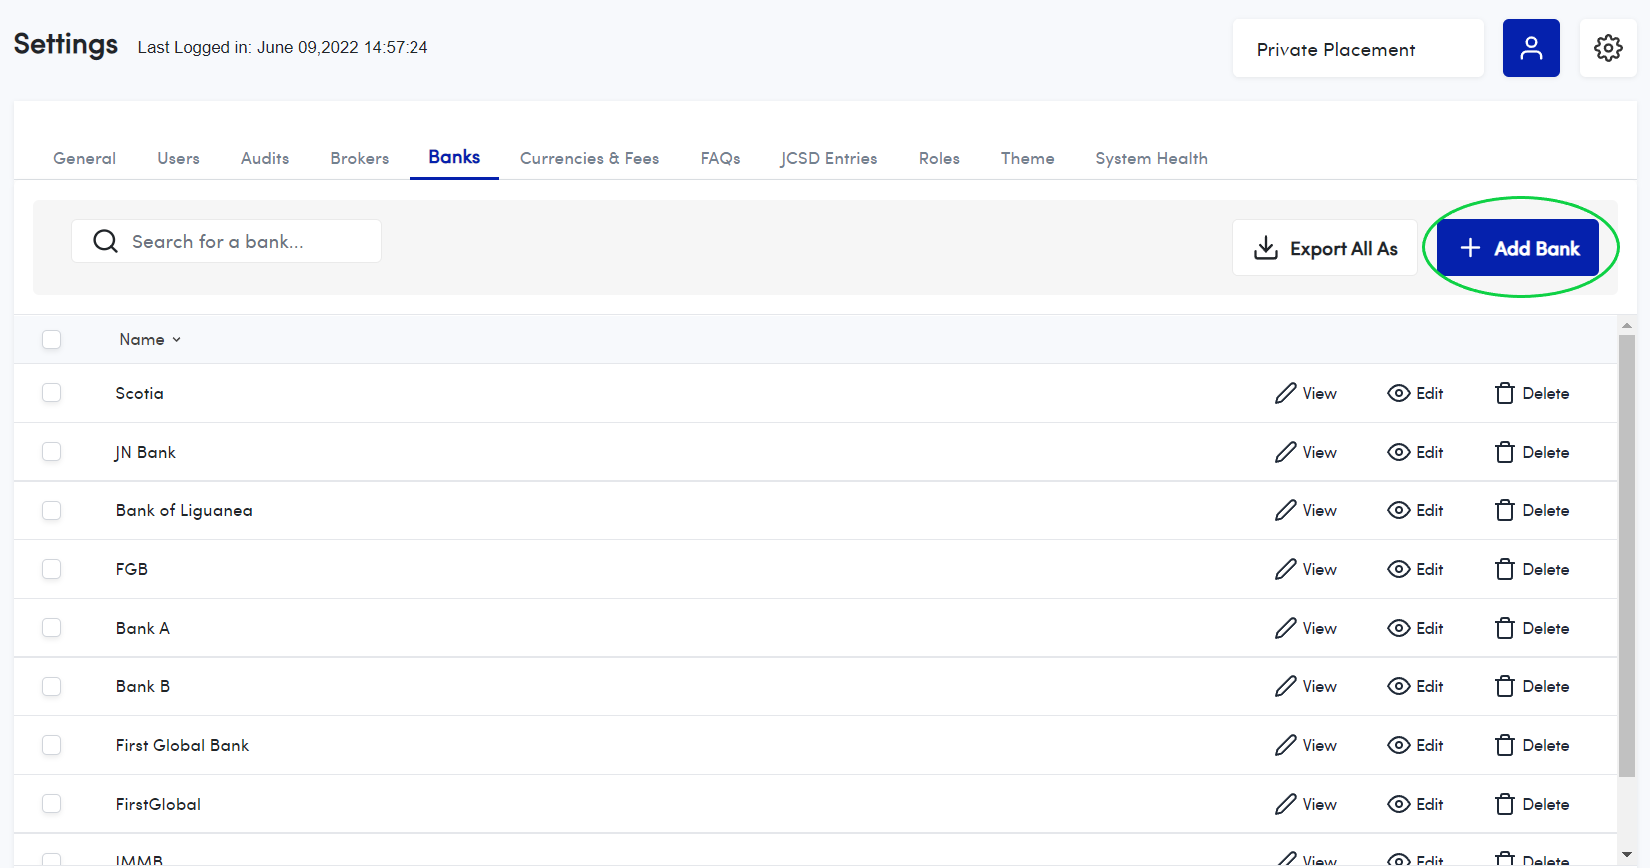
Step 4: Click on the gear icon again to open the settings menu. From the drop-down menu that appears, select "Banks".

Next, click the blue rectangular button in the top right-hand corner labeled "Add Bank"- It's in the image shown below:
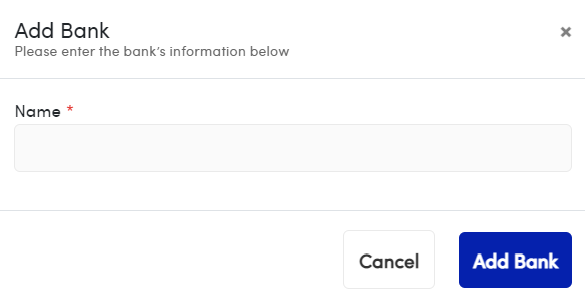
Step 5: A new window will appear. It is in the image below. Fill out the fields in this window with the Bank's name and Code. Finish by clicking the blue "Add Bank" button.
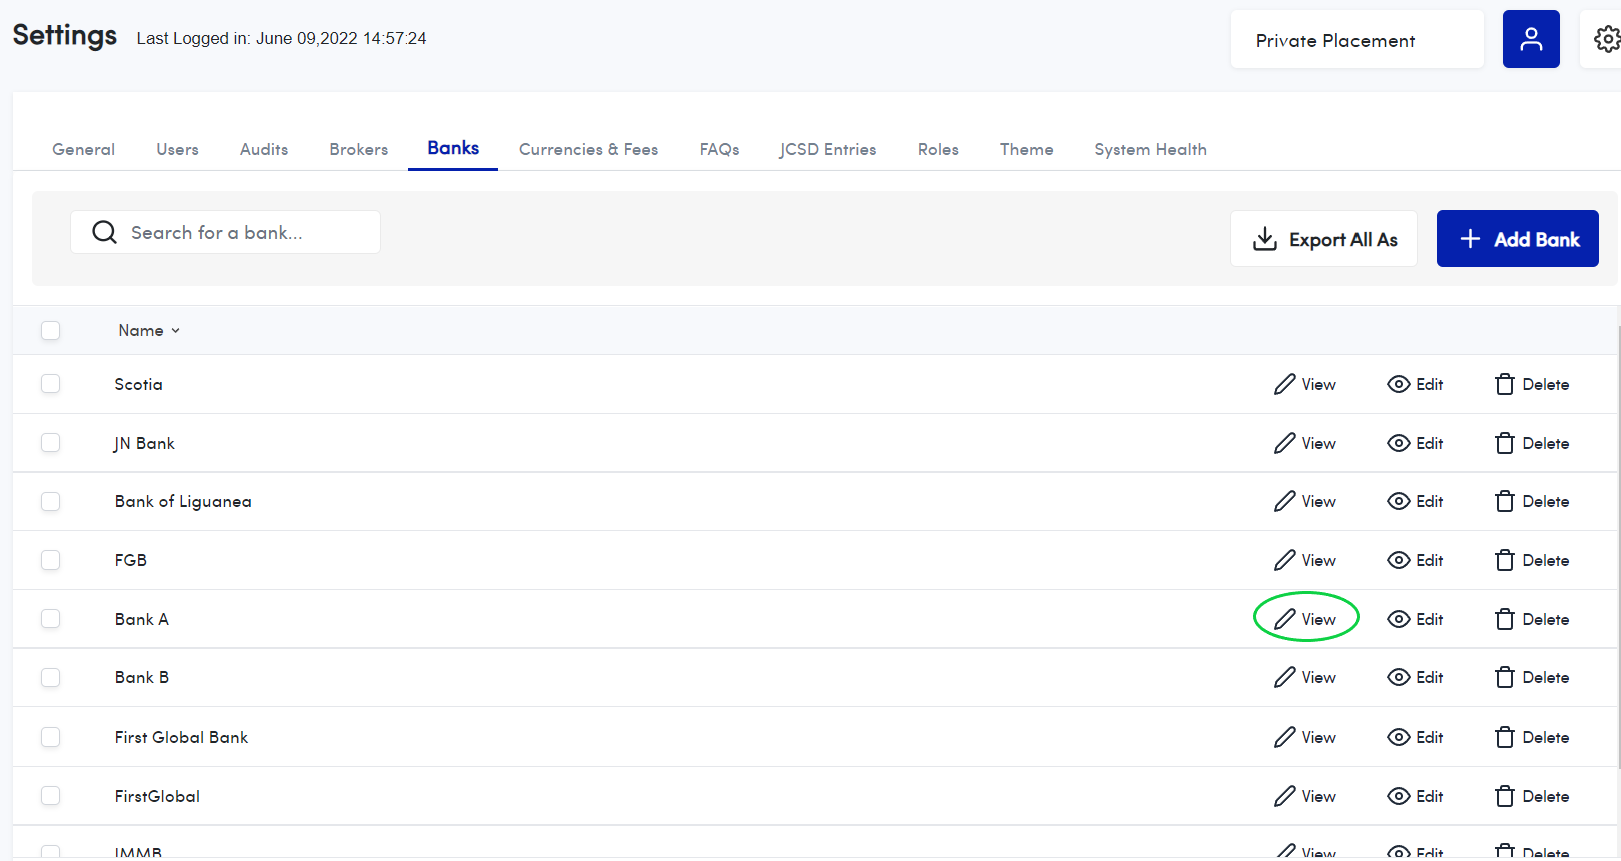
After the bank has been added, click on "View".
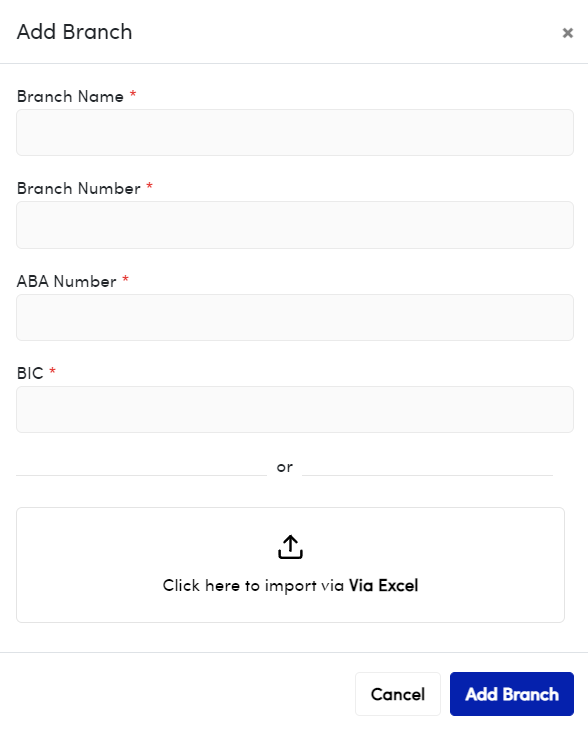
You may then click on the blue "Add Branch" button.

A new window will appear. Fill out the fields and complete by clicking the blue "Add Branch" button.
Step 6: Click on the gear icon again to open the settings menu. From the drop-down menu that appears, select "Currencies and Fees".

Next, click the blue rectangular button in the top right-hand corner labeled "Add Currency" as seen in the image shown below:

A new window will appear. It's in the image below. Fill out the fields in this window with the Currency's Name, Code, and its Symbol along with any additional information that may be required. Finish by clicking the blue "Add Currency" button.

Now you're all set! You can now create your Offer!
How do you create a Public Offer?
You can create a public offer by:
- Clicking the blue rectangular button in the top right-hand corner named "Add Offer".
- Fill out the fields to create the offer, using your company's predetermined details for the offer.
TIP
NOTE: If you would like to export the listing of ALL of the offers on the Administrative Dashboard, simply click the white rectangular button labeled "Export as" in the top right-hand section of the screen (which is right beside the "Add Offer" button) to do so.
Let's get back to creating this offer!
These images below show the fields that will appear once you click the "Add Offer" button. Just fill them out with information provided by your company in order to hand-craft your offer to the desired specifications.


After filling out all the fields, finish by clicking the button, "Add New Offer"
- Once this new offer has been successfully created, the next step is to enter the following information in the fields under each tab:
Add your Company's Banking Details
On the newly created offer, click the "View" button to begin the process. in order to see the "View" button, you will have to use the horizontal scroll bar. Use it by scrolling to the right, and the "View" button will appear alongside an 'eye' icon. Here is a close-up of this process below.

Once you click view, the "View" button for the particular offer that you have selected, a screen like the one in the image below will appear

If you look closely, you will see a series of tabs written in blue. Now click on the tab labeled "Banking Details". You'll then be taken to the screen below. Once you've done that, the "Add Banking Details" button will appear. We've circled it for you in the image below.

Click the "Add Banking Details" button. Then, the window in the image below will appear.

Fill out this form with the Broker and Currency of your choice (these would have been added prior to creating the Offer) and upload an image of the banking details information. Finish by clicking "Add Banking Details".
Add Instructions For your Customers
Add instructions that you would like your customers to follow when applying to the offers on your site here. Click the button "Add Instructions" to do so. It's highlighted for you below.

After clicking this button, a text box will pop up. Add a short name (an abbreviated name) for your offer in the relevant field and type the instructions that you want your clients to follow. Click the blue "Add instructions" button at the bottom of the window to complete this step.

Instruction Text Box
Add a Share Pool
Share Pools are critical and MUST correspond to a JSE Batch number, otherwise, a Share Pool can become invalid. So how can you add a share pool?
Step 1
Click on the "Pools" tab, then click on "Add Share Pool". This has been highlighted below.

Share Pool Menu
Step 2. Fill out the form that appears once you've clicked the "Add Share Pool" button. Fill out the form with the stock information provided by the JSE, which includes the Description for the Share Pool, its Minimum/Maximum Shares, the Increment Size, and the Unit Price. Next, select the banking details and the currency. (You will be able to select the Banking Details and Currency from the mini drop-down menus at these fields because you entered this info in the previous steps.) Now click the "Add Share Pool" button at the bottom of this window to save the changes you've just made.

Share Pool Form
Add Desired Fees
You may then move over to the tab labeled "Fees". Click the button that says "Add Fee". It has been highlighted in the image below.

Fees Menu
You will then be taken to the form shown below, where you can enter the Fee Name, the Fee Type (Flat or Percentage), the Amount, and the Currency. Select the small box at the bottom of the window to indicate whether or not it is a JCSD processing fee. Complete this process by clicking "Add Fee".

Once you click the " Add Fee" button, you will be redirected to page seen below.

Now that you've added all the details for the offer and created the share pool you can finally publish your offer. To do this, click the "Publish" button ( its highlighted in the image above).
And that's it!
The offer will now be made public! This means that the offer can be viewed on the Client Dashboard and your customers can now apply to it!
Now let's learn about "Applications" on the Metro Platform.
Applications
Once a Public Offer has been published and your clients have completed the application process to a particular offer, we can efficiently create and transfer application orders to the JCSD in batches.

Creating Batches
We can arrive at the Batches section of Metro by simply clicking the "Applications" drop-down menu. Then click on the blue rectangular button labeled "View Batch" which is found in the top-right section side of the screen.

Then click the "Add Batch" button seen here in the image above. This will bring up the form displayed in the image below.

Fill in the fields shown in the image above and click "Add Batch".
NOTE
Each batch needs an ID number which must be supplied by the JSE/JCSD in order to create a batch. Without this, you cannot create a batch.
Grouping Applications in Batches
NOTE
Metro automatically groups approved applications according to the IPO that was applied to! That means that sending applications to the JCSD can be done with a few steps!
Step 1. Identify the batch you want to send off. See a listing of batches in the image below.
Step 2. Click the "View" button. It is circled in green for you in the image below.

Step 3. Click the button labeled "Submit to JCSD" located on the right side of the screen. And that's it! You have just sent a batch of applications off to the JCSD, in an efficient way!

Viewing a Specific Batch of Approved Applications
---