Appearance
Settings
Now that we've covered the main aspects of Metro, we can move on to the other functions that the Metro Platform facilitates. These include customization and general configuration.
To access the Settings menu, click on the gear icon in the top-right corner of the screen. Just in case you are having difficulty finding it, we've circled it for you in the image below.
NOTE
There is ONE settings menu that applies to both the private and IPO sections of Metro.
WARNING
NOTE: The JSCD Entries Section does not apply to private placements.

Image showing where to access the Settings Menu
Remember, this gear opens a drop-down menu, which lists menu options. Check out this image below to see these menu options up-close.

Drop-Down list of Settings
Now let's talk about what each of these options allows you to do.
General
The first Settings menu option you will see is "General". This allows you to set up reminder Email Notification settings for your Offers as well as for Closure Letters. Simply enter the email address into the empty fields that you would like notifications to be sent to or sent from.
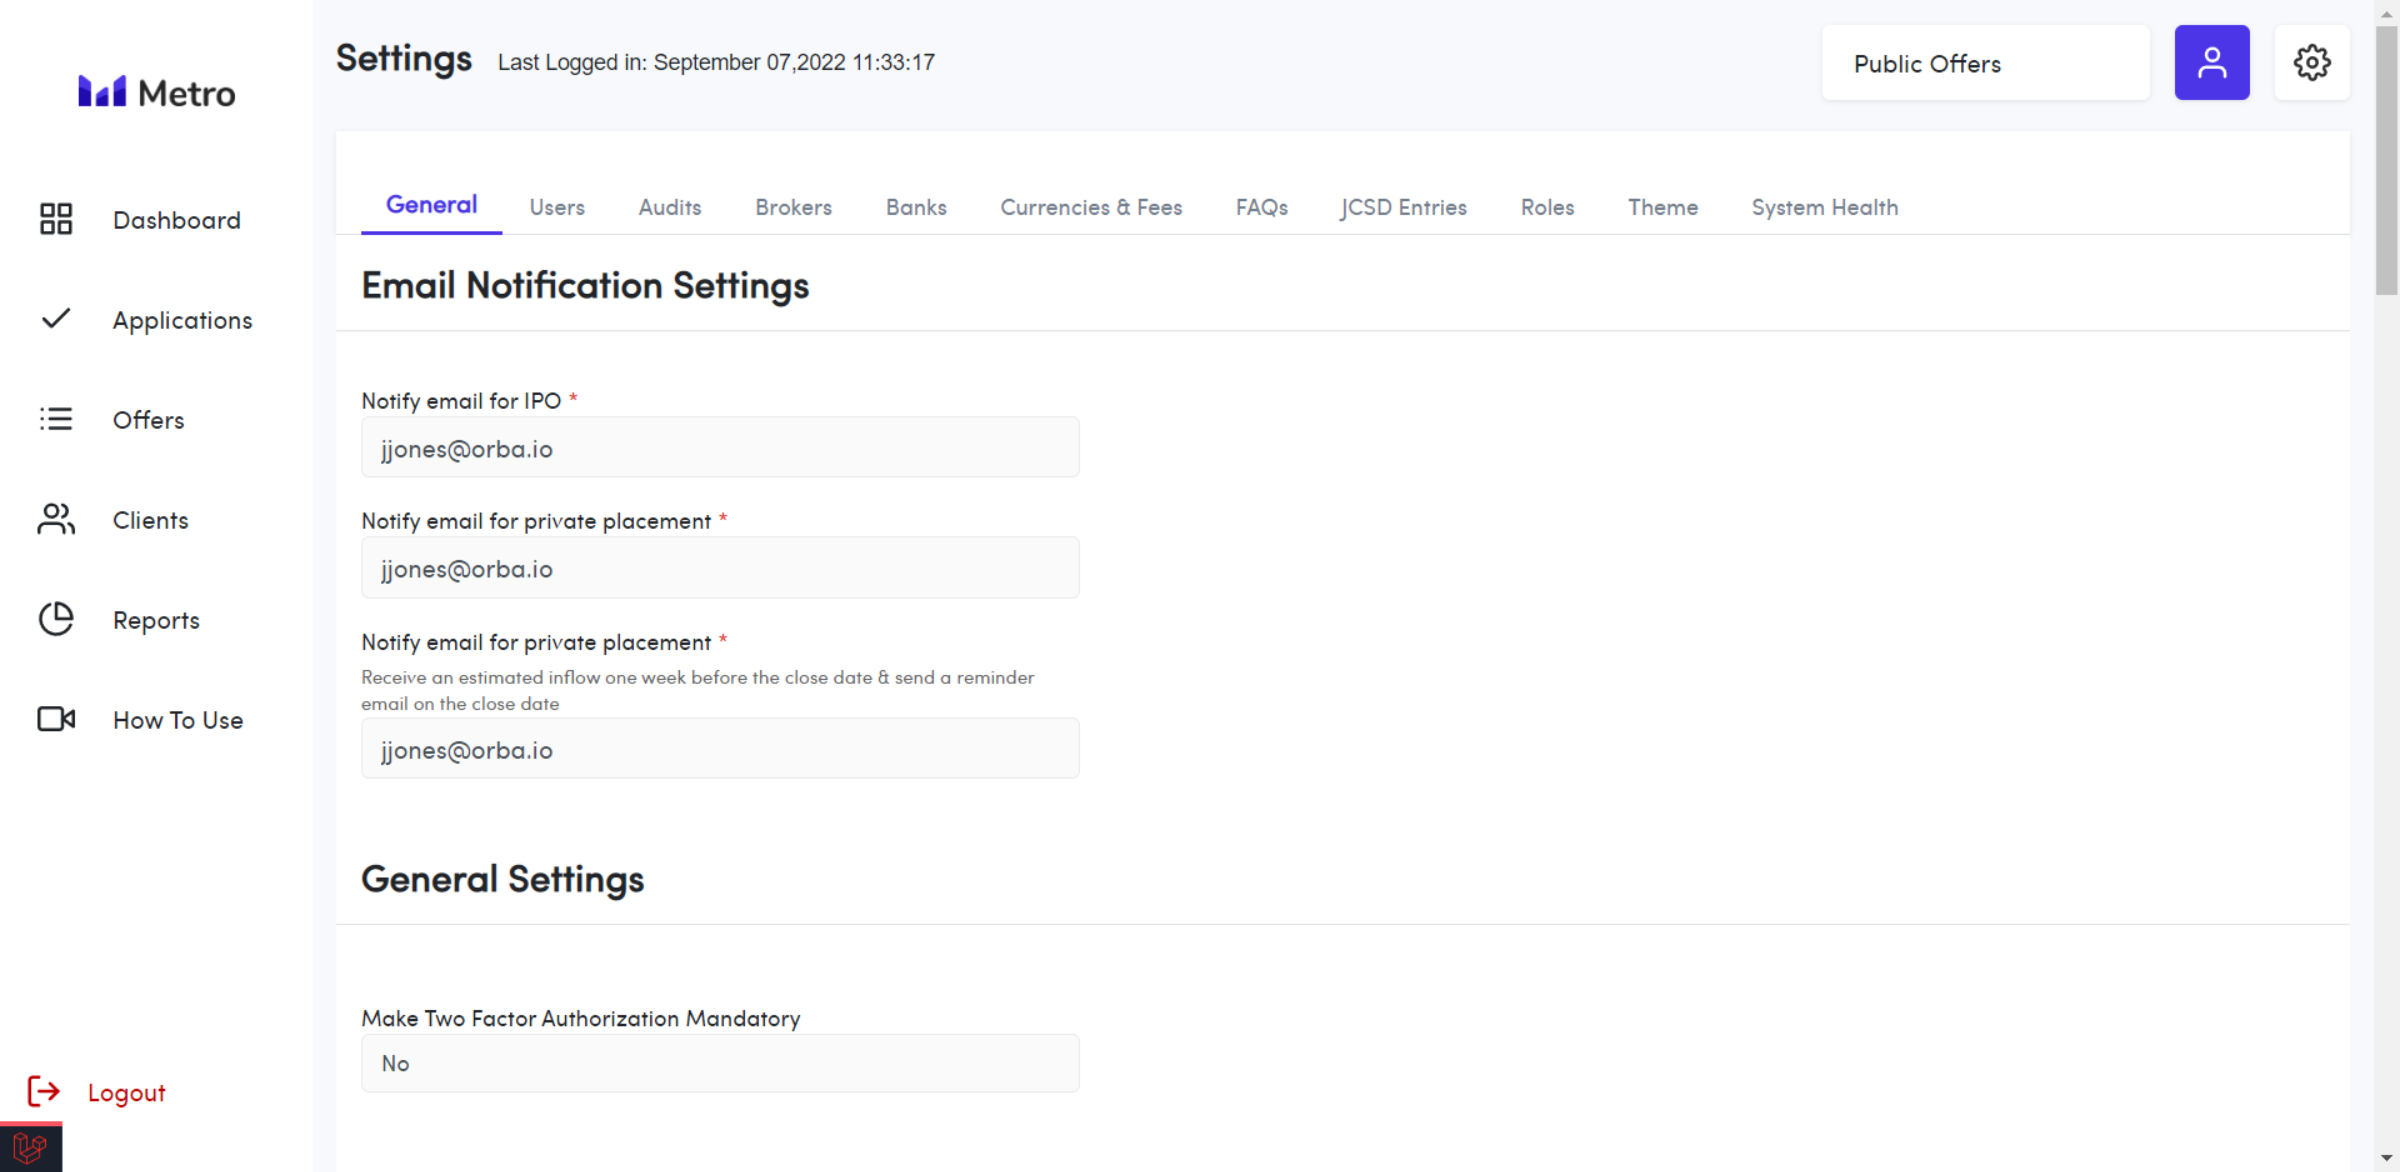
General Settings
This section now only contains an input field to toggle Mandatory Two Factor Authentication.
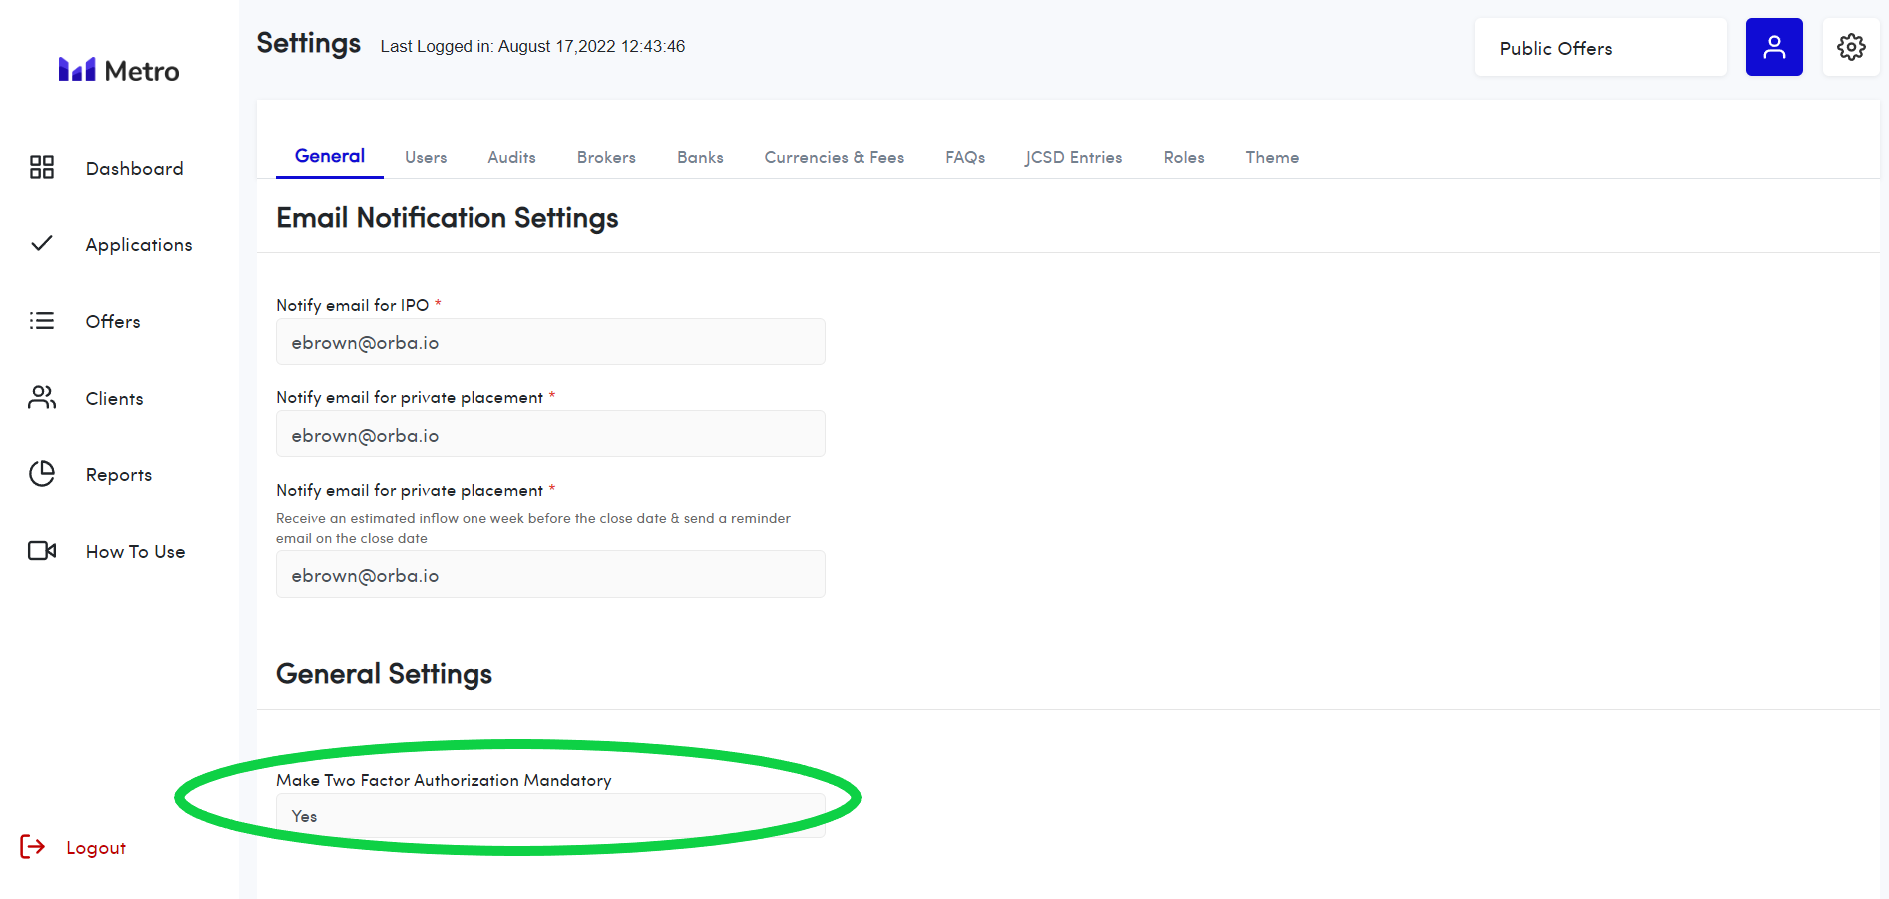
When this is toggled on, both the client and the admins will have to enable Two Factor Authentication in order to use the application. If an admin or client does not have Two Factor Authentication turned on, a pop-up will show up after login prompting them to enable it.
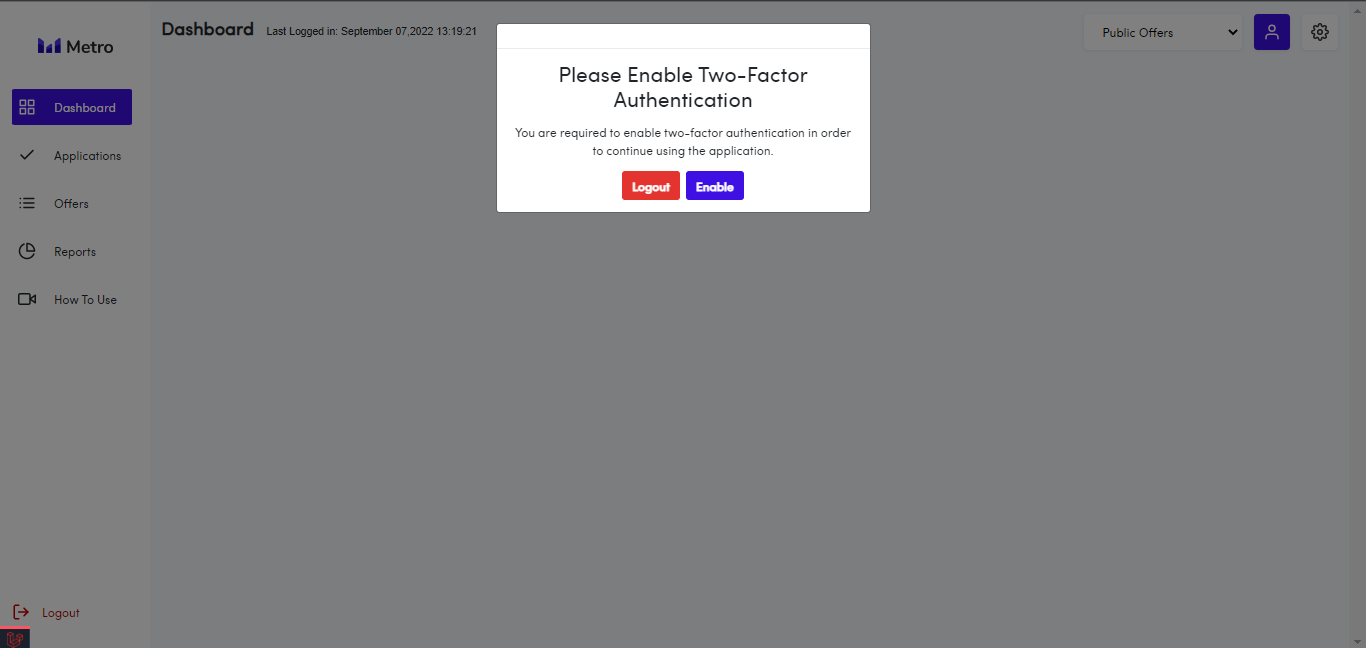
Two Factor Authentication prompt on admin
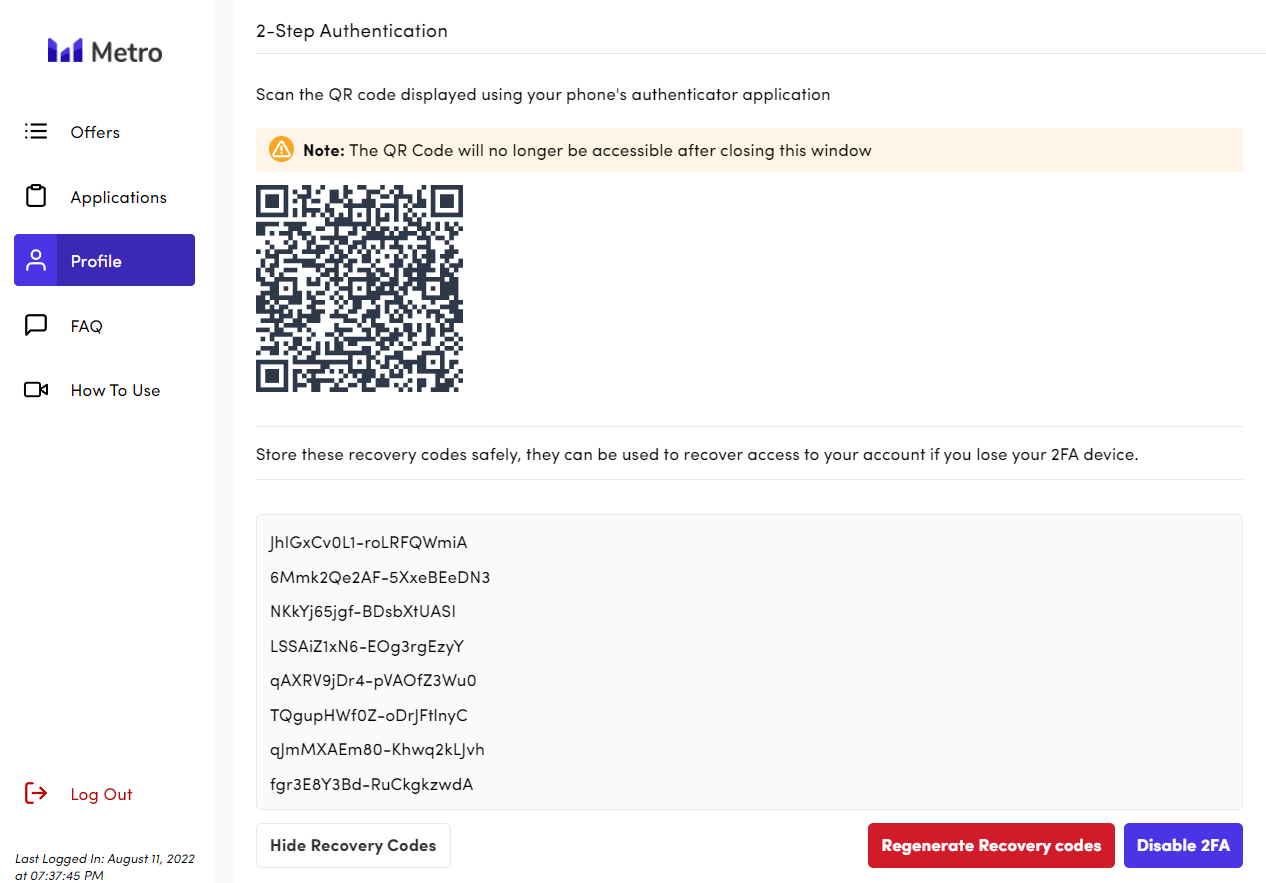
After clicking Enable, you will be brought to the screen displayed below.

QR code for authenticator app and recovery codes (Admin)
This screen displays the 2FA QR code meant to be scanned with an authenticator app on a mobile device as well as the recovery codes if the device cannot be accessed for whatever reason. You also have the option to download the codes and disable 2FA.
Client
Here is what 2FA would look like on the client side:
QR code for authenticator app and recovery codes (Client)
Note that the client side does not provide the option to download the recovery codes and only to copy/paste them. They are limited until more are generated using the "Regenerate Recovery codes" button.
Oversubscription Validation
By default, the system will allow administrative users to approve offer applications even after the maximum number of units has been applied for.
To disable this behavior and allow oversubscription validation, administrative users must navigate to the general settings page and "Enable Oversubscription Validation"

Once the changes are saved, users will no longer be able to approve applications that will go over the subscription limit.

Client Settings
The general settings contain information that is relevant to the client-side application. Those fields are:
- Client Logo and Banner
- Company name
- Platform Name
- Mobile App Name
- Contact Email
- Link to Android or IOS signature application
- Link to embedded map *
- A toggle for joint holder validation *
- A toggle for joint holder confirmation
- A toggle for enabling mandatory two factor authentication for both client and admin
Please note: For the embedded map link input field, you should put the URL found in the src attribute of the copied embedded map. An example of embedded map would look like this:
<iframe src="https://www.google.com/maps/embed?pb=!1m18!1m12!1m3!1d15176.326707049588!2d-76.7779862880707!3d18.021412726057477!2m3!1f0!2f0!3f0!3m2!1i1024!2i768!4f13.1!3m3!1m2!1s0x8edb3efcb798432d%3A0x29b3e98bc79c4dcc!2sSovereign Centre!5e0!3m2!1sen!2sjm!4v1662564586581!5m2!1sen!2sjm" width="600" height="450" style="border:0;" allowfullscreen="" loading="lazy" referrerpolicy="no-referrer-when-downgrade"></iframe>
However, only the part highlighted in green should be placed in the embedded map link input.
Please Note: When the joint holder validation is enabled, the features related joint holders will become available. After the applicant reaches step 2 (joint holder step), certain information (such as names and emails) for all joint holders on the JCSD account will be automatically populated. The applicant will not be able to continue the application process unless the number of joint holders in step 2 matches the number on the JCSD account.

Closure Letter Settings
The final section of the general settings page corresponds to the closure letter. A closure letter can be generated once an offer is closed. All clients that applied to the offer will receive a closure letter once this is done.
To configure the closure letter, administrative users will need to populate the displayed field and they will appear within the generated closure letter. The fields relating to the closure letter are as follows:
- Signee Full Name
- Signee Title
- Signee Signature (Optional)
- Investment Bank Name
- Address Lines 1 and 2
- Telephone Number
- Fax
- Customer Service Number
- Website
- Directors
- Logo (Optional)
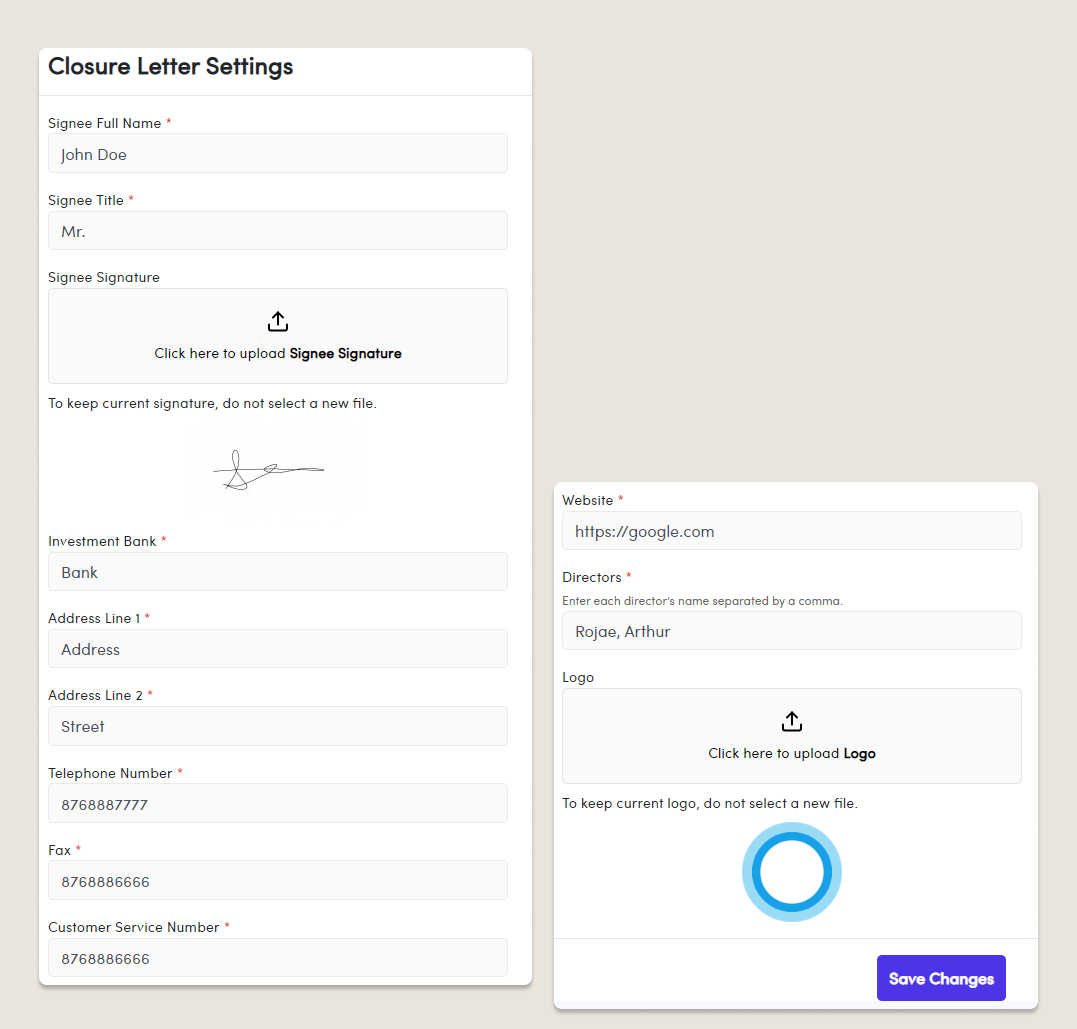
Then save these changes that you've made, by clicking the "Save Changes" button. And that's it!
Users
The next menu option is called "Users". This displays all current users. It allows you to:
- Add a new user. Do this by clicking "Add User" and filling in the fields that appear. Then save the changes you've made by clicking "Create User".
- View or edit user information. You can do this when you click on the words "View" or "Edit" on the right-hand side of the page in the same line as the particular user's name. If you have edited a user's information, click "Edit User" to save the changes you have made.
- Delete a user(s) from the system. You can do this by clicking on the word "Delete", which can be found on the right-hand side of the page in the same line as the particular user's name. A drop-down window will appear with a red button called "Delete User". Click it.
- Export the existing list of users in various file formats. Simply click the white rectangular button in the top right section of the page labeled "Export as", then view the drop-down menu and click on the format you would like the information to be compiled in. Then look out for the downloaded document. Double click on it to open it! Now you have information at your fingertips in your chosen format!

Audits
Every action in the Metro platform is recorded and logged and can be found under "Audits". The audit log shows you which user logged on, what section they conducted an activity/function in, and what activity/ function they executed. It even shows very granular data stemming down to the data changed.

To view the data that was changed, scroll across and click on the "View" button.

This will generate a breakdown of the Audit itself. This is shown in the below image.

Sample Audit View
Brokers
In this section, you can add brokers and broker numbers to the system. We executed this step earlier before we began creating the offer. To review this go to the section entitled, " Public Offers"
Banks and Bank Branches
In this section, you can add a bank name to the system. We executed this step earlier before we began creating the offer. To review this go to the section entitled, " Public Offers"
Currencies And Fees
In this section, you can add currencies and fees to the system. We executed this step earlier before we began creating the offer. To review this go to the section entitled, " Public Offers"
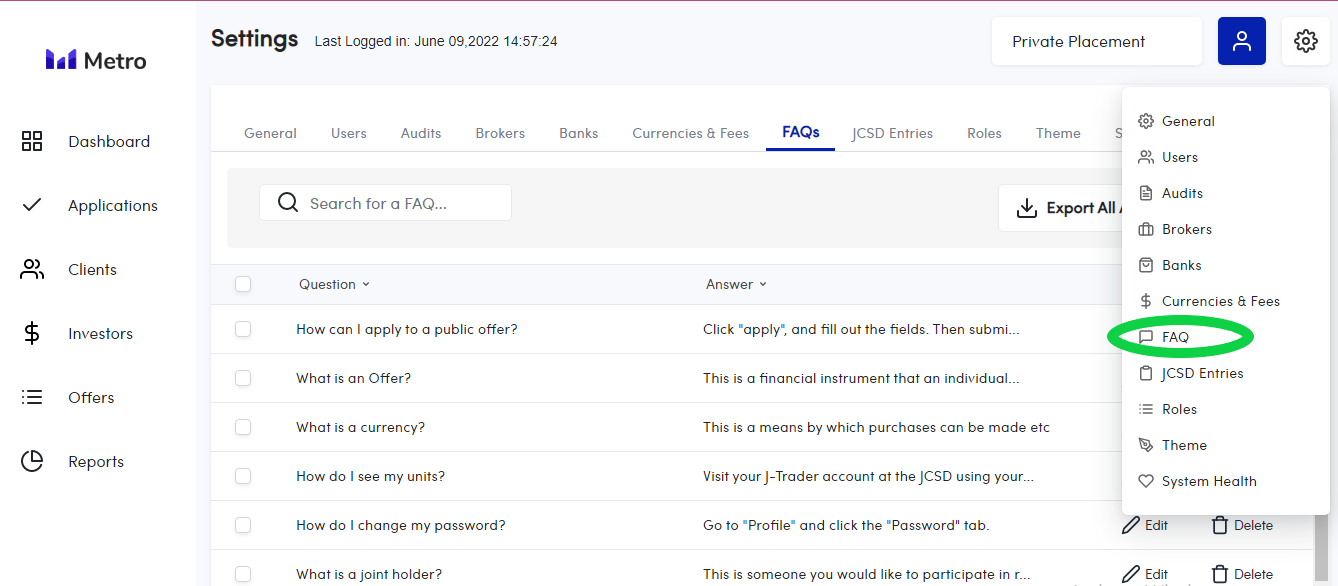
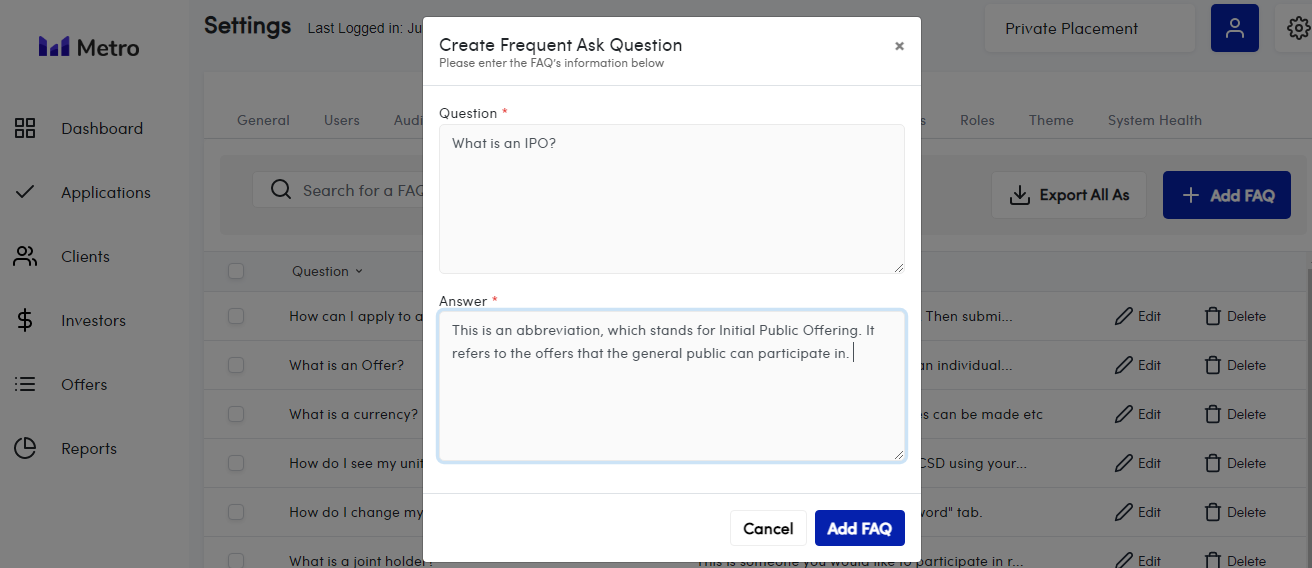
FAQs
Adding an FAQ ( Frequently Asked Question) is very simple.
- Click on the FAQ tab in the Settings Menu.
- Click the "Add FAQ" button.
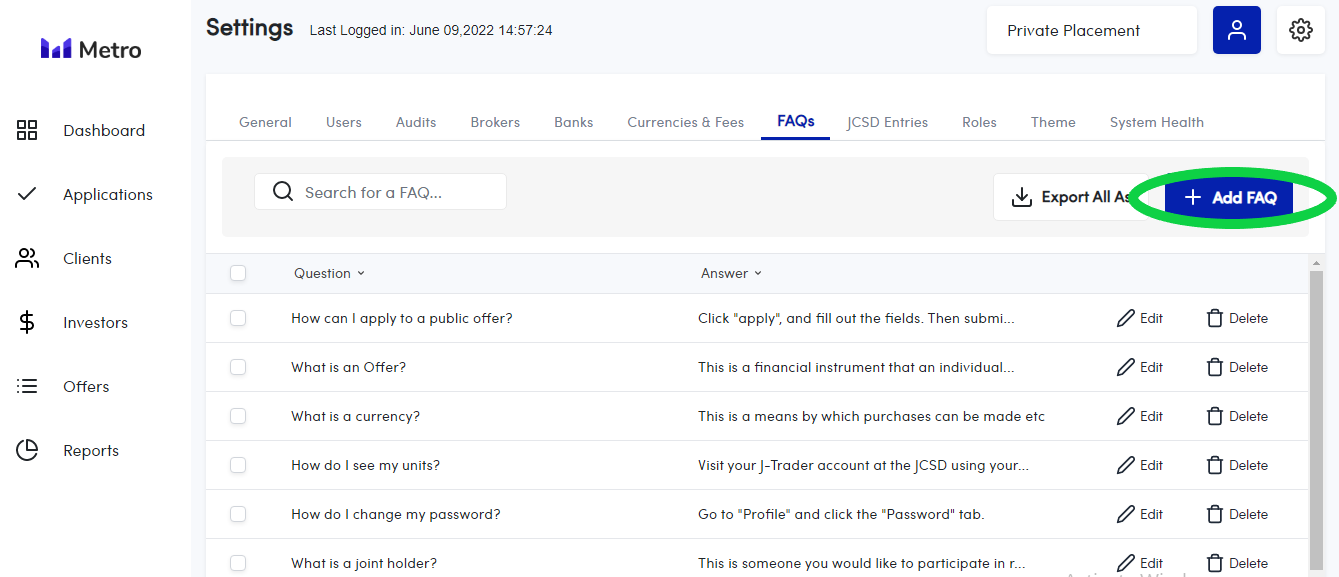
- A text box will appear. Fill in the information that will assist your clients in the text box as seen here in the image below. Then click "Add FAQ". This information will appear on the client website, in the FAQ Tab seen in the main menu.
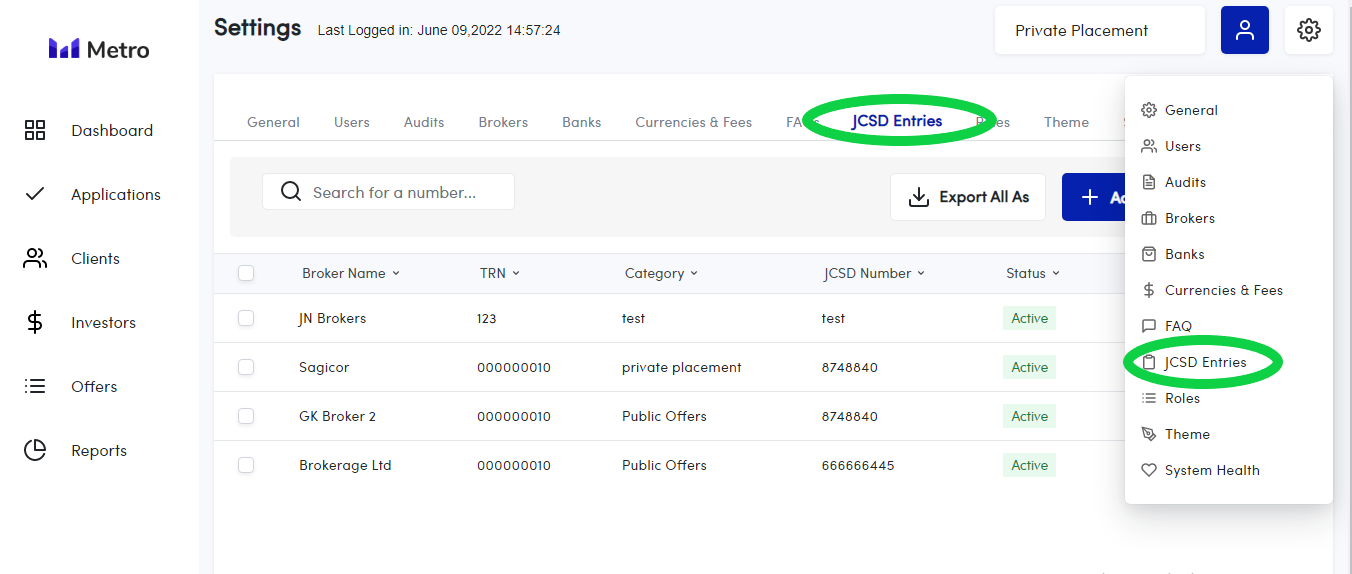
JCSD Entries
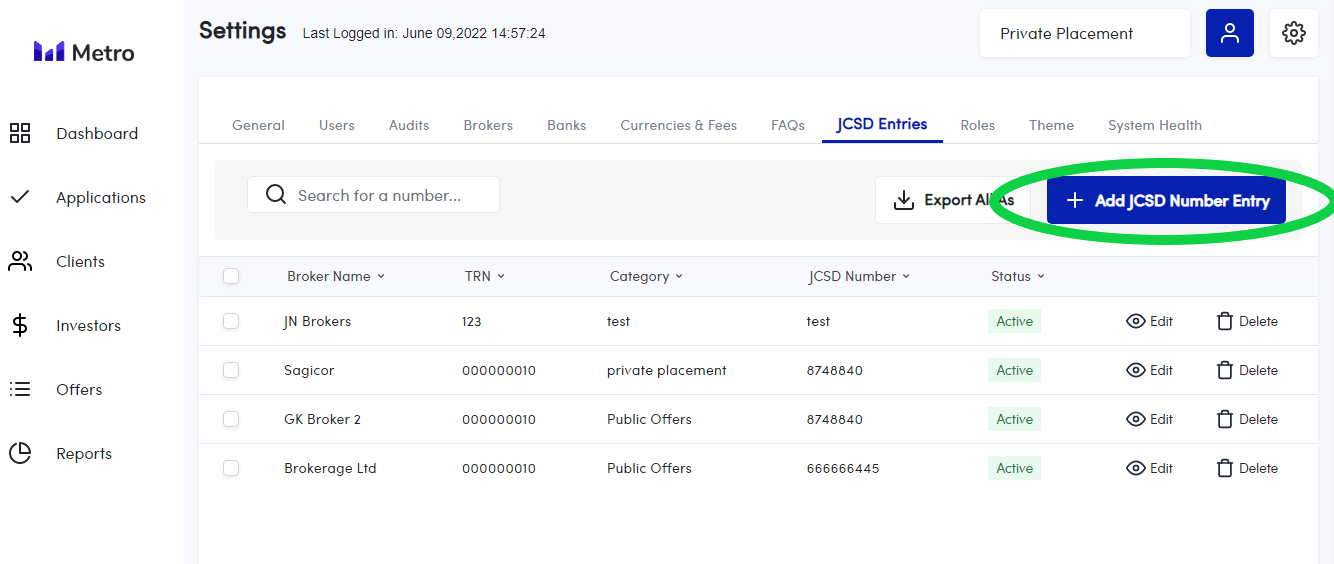
You can store valid JCSD number entries in this section. This enables you to manually check validity while reviewing applications in the event of any Depend system downtime. This will be demonstrated below:
- Go to the settings menu and select "JCSD Entries". Note- there is a horizontal menu that houses the same tabs, which you can also click on. See this below.
- Click the following button in the image below.
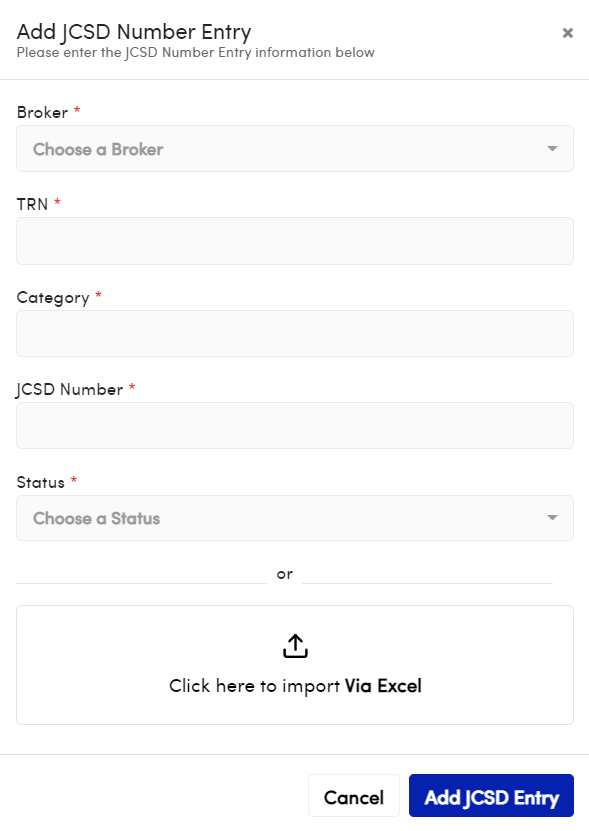
- A new window will appear. See this in the image below. Fill out the fields and click the blue "Add JCSD Entry" button.
NOTE
assign a status to the JCSD number so that the reviewer knows which numbers are ACTIVE.
Roles and Permissions
Definition of Terms
Our permission system has two components Permission Types and Permission Actions. Each Permission Type has a generic list of 7 Permission Actions. You can enable and disable permission actions for each permission type when creating and editing a role. Example:

The permission has a large list of permission types and permission actions. Permission types include things such as Application and Share Pool. Permission types should cover most of the features within the application.
Full List of Permission Types
- Accredited Investor
- Application
- Private Application
- Private Offer
- Dashboard
- Audit
- Bank
- Broker
- Broker Selling Agent
- Currency
- Director
- Faq
- Invitee
- Jcsd Number Entries
- Prospectus
- Selling Agent
- Setting
- General Settings
- Share Pool
- Theme
- User
- Role
- Permission
- User Management
- Video
- Client
- Report
- Batch
- Submit JCSD
NOTE
Each permission type is associated with 7 permission actions: View, Create, Edit, Delete, Approve, Reject and Allow.
The first six permission actions are functionally defined: View, Create, Edit, Delete, Approve, Reject and Allow. For example, for the Application permission type, the view action allows users to view applications and the create permission allows users to create applications. This pattern continues for all permission Types.
The seventh permission action, Allow, is used for all use cases not covered by the others. These are the edge cases this allows permission covers:
| Permission Type | Permission Action | |
|---|---|---|
| Prospectus | Allow | This determines whether the user can publish an offer |
| This determines whether the user can unpublish an offer | ||
| This determines whether the user can download an offer’s banking details. | ||
| This determines whether the user can generate a closure letter (this is a letter that is sent out after an offer is closed) | ||
| Submit JCSD | Allow | This determines whether the user can submit batches to the JCSD. |
Adding New Roles
You can also customize the roles that you would like to have on your system by clicking the "Add Role" button. The "Add Role" button has been circled for you below.

After clicking the "Add Role" button, the following will appear. Fill out the fields. Be sure to add the Permissions for the Role. Simply select the permissions from this list and click "Add Role".

The image below shows what the saved role with specific permissions will look like. You can see this by going to "Roles" and clicking on "Edit".

NOTE
There is a master list of permissions on the Metro platform. To see this list, simply select the specific Role, and click "Edit". After doing this, the following list will come up. You can then select or de-select the permission (action) that a person assigned to this role can execute by clicking on the purple boxes.
DANGER

Theme
In this section, you can make changes to the "look and feel" of the site. Add your logo, change the colours and the and add the links for your social media here. See the arrows in the image below.

Then save the changes you have made.

System Health
This section provides engineers with status updates that can be used to determine the root cause of any issue that may arise. This is shown below.

Troubleshooting
This section will outline Orba's recommendations for potential, but not probable, issues that may arise after installation. To ensure that our customers’ solutions/services are reliable and stable, we perform the necessary internal optimization tests to ensure our solutions meet the needs of our customers’ business and maintain the confidence of our stakeholders.
Black Screen
When attempting to export large numbers of applications, an issue related to memory limit may arise that results in a black screen being displayed. To that end, Orba has ensured that the PHP memory size is at least 512M in order to handle large loads and uses a method that queues chunks of applications instead of attempting to handle one set of data.
Recommendations:
- We suggest that the client's UAT Team performs both load testing and stress testing prior to application go-live. This ensures that the testing covers the software performance under some expected load (regular or peak) and pushes the bar beyond peak conditions to determine the system’s load capacity as well as any point of a complete failure for loads that only they can project.
Application Slowness/Lag
There may sometimes be, depending on the client's system configurations, a slowdown in performance experienced by the client.
Recommendations:
- **** Client should ensure that the minimum application system requirements stated in this manual are adhered to.
- Application server's minimum specs should be 16GB of RAM; 4 vCPUs; and 25-100GB of free disk space. If slowdown persists, then increase as needed.
- Both UAT and Production are required to have the same specifications in terms of hardware to support Docker containers on-site.
- Additionally, migrating to a cloud platform such as Amazon Web Services, Google Cloud Platform or Microsoft Azure would adequately allow resources to scale on demand, relative to the workload.
Accounts with Missing Passwords in Database
There may be situations where users in the database appear not to have a password.
- This is by design; Once a primary applicant lists a Joint Holder via the application process, a User Account is automatically created and the Joint Holder is emailed, prompting the user to activate their account which involves creating and confirming their password and logging in.
Connectivity Issues
If Depend Credentials are not valid for whatever reason, then users will not be able to complete the application process.
Recommendations:
- Client should ensure that Depend Credentials are valid well before the IPO open date.